魔改前必看(我当你们都懂了,太细节的就不写在教程中了🤣🤣🤣)
1.博客魔改有风险,如果博客魔改出问题了又没有备份,可通过此项目查看基础源码进行回滚:jerryc127/hexo-theme-butterflyccknbc-actions/blog-butterfly.这部分魔改基本上都是大佬们造好的轮子,我按照大佬们的轮子结合自己的喜好进行魔改的,如有侵权请联系删除。
2.鉴于每个人的根目录名称都不一样,本帖博客根目录一律以[BlogRoot]指代。
3.本帖涉及魔改源码的内容,会使用diff代码块标识,复制时请不要忘记删除前面的+、-符号。
4.因为.pug和.styl以及.yml等对缩进要求较为严格,请尽量不要使用记事本等无法提供语法高亮的文本编辑器进行修改。
5.本帖基于Butterfly主题进行魔改方案编写,因此请读者优先掌握Butterfly主题官方文档的内容后再来进行魔改。
6.魔改会过程常常引入自定义的css与js文件,方法见Hexo博客添加自定义css和js文件(后续引入)
博客搭建与魔改系列教程导航🚥🚥🚥
1.🥬Hexo博客搭建基础教程(一) ⇦当前位置🪂
2.🍒Hexo博客搭建基础教程(二)
3.🥪Hexo博客搭建基础教程(三)
4.🍀博客魔改教程总结(一)
5.🍚博客魔改教程总结(二)
6.🎋博客魔改教程总结(三)
7.🥕博客魔改教程总结(四)
8.🍊博客魔改教程总结(五)

搭建环境

本文分为本机搭建和云端构建,本机搭建通过在本地搭建好必备环境配备代理工具以及上传仓库;而云端构建通过使用github action来进行操作,用写好的yml代码来进行构建。

本机搭建

环境与工具准备

操作系统:Windows11 24H2
Node v22.14.0
Git
Hexo V6.3.0
文本编辑器(强烈推荐VSCODE)
GitHub 帐号
一个域名(强烈推荐买个域名)
云服务器(可选)

下载node并简单切换镜像源

  1. 打开Node官网,下载和自己系统相配的Node的安装程序。下载地址:https://nodejs.org/en/download/
  2. 下载后安装,安装的目录可以使用默认目录【C:/Program Files/nodejs/】,也可以自定义路径。这个环境路径切换坑也很多,如果大家C盘空间足够可以直接装C盘,如果想切换其他盘或者把环境遍历切换到自定义路径也可以,具体教程百度(不过坑比较多就是了)!
  3. 安装完成后,检查是否安装成功。在键盘按下win + R键,输入CMD,然后回车,打开CMD窗口,执行node -v命令,看到版本信息,则说明安装成功。
  4. 切换npm源:
1
npm config set registry https://registry.npmmirror.com
1
npm config set registry https://npm.aliyun.com
1
npm config set registry http://mirrors.cloud.tencent.com/npm/
1
npm config set registry https://mirrors.huaweicloud.com/repository/npm/

安装Hexo

在终端输入如下命令安装:

1
npm install -g hexo-cli

如果成功会出现以下内容:

1
2
3
4
added 1 package, removed 30 packages, and changed 52 packages in 12s

14 packages are looking for funding
run `npm fund` for details

再次在终端中输入命令:

1
npm install hexo-server --save

如果成功会出现以下内容:

1
2
3
4
added 48 packages in 4s

3 packages are looking for funding
run `npm fund` for details

注册github账号

看这个注册视频,按照步骤即可:

Git安装

  1. 进入官网:https://git-scm.com/downloads ,由于官网下载太慢可以通过淘宝的开源镜像下载 网址:https://registry.npmmirror.com/binary.html?path=git-for-windows/v2.36.1.windows.1/ ,下载版本更具自己的需求选择即可。

  2. 下载后傻瓜式安装Git即可,安装的目录可以使用默认目录【C:/Program Files/Git】,也可以自定义路径。

  3. 点击电脑左下角开始即可看见Git Bash。

git快捷方式

  • Git CMD 是windows 命令行的指令风格
  • Git Bash 是linux系统的指令风格(建议使用)
  • Git GUI是图形化界面(新手学习不建议使用)
  1. 常用命令
1
2
3
git config -l  //查看所有配置
git config --system --list //查看系统配置
git config --global --list //查看用户(全局)配置
  1. 配置用户名和邮箱:
1
2
git config --global user.name "你的用户名"
git config --global user.email "你的邮箱"
  1. 查看git当前配置:
1
git config -l

部署博客

初始化hexo

  1. 在目标路径(我这里选的路径为【D:/sxiaohe/sxiaohe】)打开cmd命令窗口,执行hexo init初始化项目。
1
hexo init blog-demo

如果成功会出现以下内容:

1
2
3
4
5
6
7
INFO  Cloning hexo-starter https://github.com/hexojs/hexo-starter.git
INFO Install dependencies
warning ..\package.json: No license field
warning hexo > warehouse > cuid@2.1.8: Cuid and other k-sortable and non-cryptographic ids (Ulid, ObjectId, KSUID, all UUIDs) are all insecure. Use @paralleldrive/cuid2 instead.
warning hexo-renderer-stylus > stylus > glob@7.2.3: Glob versions prior to v9 are no longer supported
warning hexo-renderer-stylus > stylus > glob > inflight@1.0.6: This module is not supported, and leaks memory. Do not use it. Check out lru-cache if you want a good and tested way to coalesce async requests by a key value, which is much more comprehensive and powerful.
INFO Start blogging with Hexo!
  1. 进入blog-demo ,输入npm i安装相关依赖:
1
2
cd blog-demo  //进入blog-demo文件夹
npm i

如果成功会出现以下内容:

1
2
3
4
5
6
changed 16 packages, and audited 228 packages in 3s

32 packages are looking for funding
run `npm fund` for details

found 0 vulnerabilities
  1. 初始化项目后,blog-demo有如下结构:
1
2
3
4
5
6
7
8
9
10
11
12
13
14
15
16
17
18
|-- blog-demo
|-- .gitignore
|-- package-lock.json
|-- package.json
|-- yarn.lock
|-- _config.landscape.yml
|-- _config.yml
|-- .github
| |-- dependabot.yml
|-- scaffolds
| |-- draft.md
| |-- page.md
| |-- post.md
|-- source
| |-- _posts
| |-- hello-world.md
|-- themes
|-- .gitkeep

文件夹介绍:
【node_modules】:依赖包
【scaffolds】:生成文章的一些模板
【source】:用来存放你的文章
【themes】:主题
【.npmignore】:发布时忽略的文件(可忽略)
【_config.landscape.yml】:主题的配置文件
【config.yml】:博客的配置文件
【package.json】:项目名称、描述、版本、运行和开发等信息
4. 输入hexo server或者hexo s 启动项目,启动成功终端会出现以下内容:

1
2
3
INFO  Validating config
INFO Start processing
INFO Hexo is running at http://localhost:4000/ . Press Ctrl+C to stop.

初始化github存储库

当我们新建存储库后,需要对存储库进行初始化

  1. 在bash中键入以下代码,初始化存储库:
1
2
3
4
5
6
7
echo "# ACTION" >> README.md
git init
git add README.md
git commit -m "first commit"
git branch -M main
git remote add origin https://github.com/661111/ACTION.git
git push -u origin main

终端输出:

1
2
3
4
5
6
7
8
9
10
11
C:\Users\ASUS>echo "# ACTION" >> README.md
C:\Users\ASUS>git init
Initialized empty Git repository in C:/Users/ASUS/.git/
C:\Users\ASUS>git add README.md
C:\Users\ASUS>git commit -m "first commit"
[master (root-commit) ac892ea] first commit
1 file changed, 1 insertion(+)
create mode 100644 README.md
C:\Users\ASUS>git branch -M main
C:\Users\ASUS>git remote add origin https://github.com/661111/ACTION.git
C:\Users\ASUS>git push -u origin main
  1. github页面如图,已经创建好了:
    alt text

部署到github存储库

  1. 安装 hexo-deployer-git:
1
npm install hexo-deployer-git --save
  1. 修改 _config.yml 文件
    在blog-demo目录下的_config.yml,就是整个Hexo框架的配置文件了。可以在里面修改大部分的配置。详细可参考官方的配置描述。
    修改最后一行的配置,将repository修改为你自己的github项目地址即可,还有分支要改为main代表主分支(注意缩进)。
1
2
3
4
deploy:
type: git
repository: https://github.com/661111/ACTION.git
branch: main
  1. 修改好配置后,运行如下命令,将代码部署到 GitHub(Hexo三连):
1
2
hexo clean && hexo generate && hexo deploy  // Git BASH终端
hexo clean; hexo generate; hexo deploy // VSCODE终端
  • hexo clean:删除之前生成的文件,若未生成过静态文件,可忽略此命令。
  • hexo generate:生成静态文章,可以用hexo g缩写
  • hexo deploy:部署文章,可以用hexo d缩写
    如果成功会出现以下内容:
1
2
3
4
5
6
7
8
9
10
11
12
13
14
15
16
17
18
19
20
21
22
23
24
25
26
27
28
29
30
31
32
33
34
35
36
37
38
39
40
41
42
43
44
45
46
47
48
49
50
51
52
53
54
55
56
57
58
59
60
61
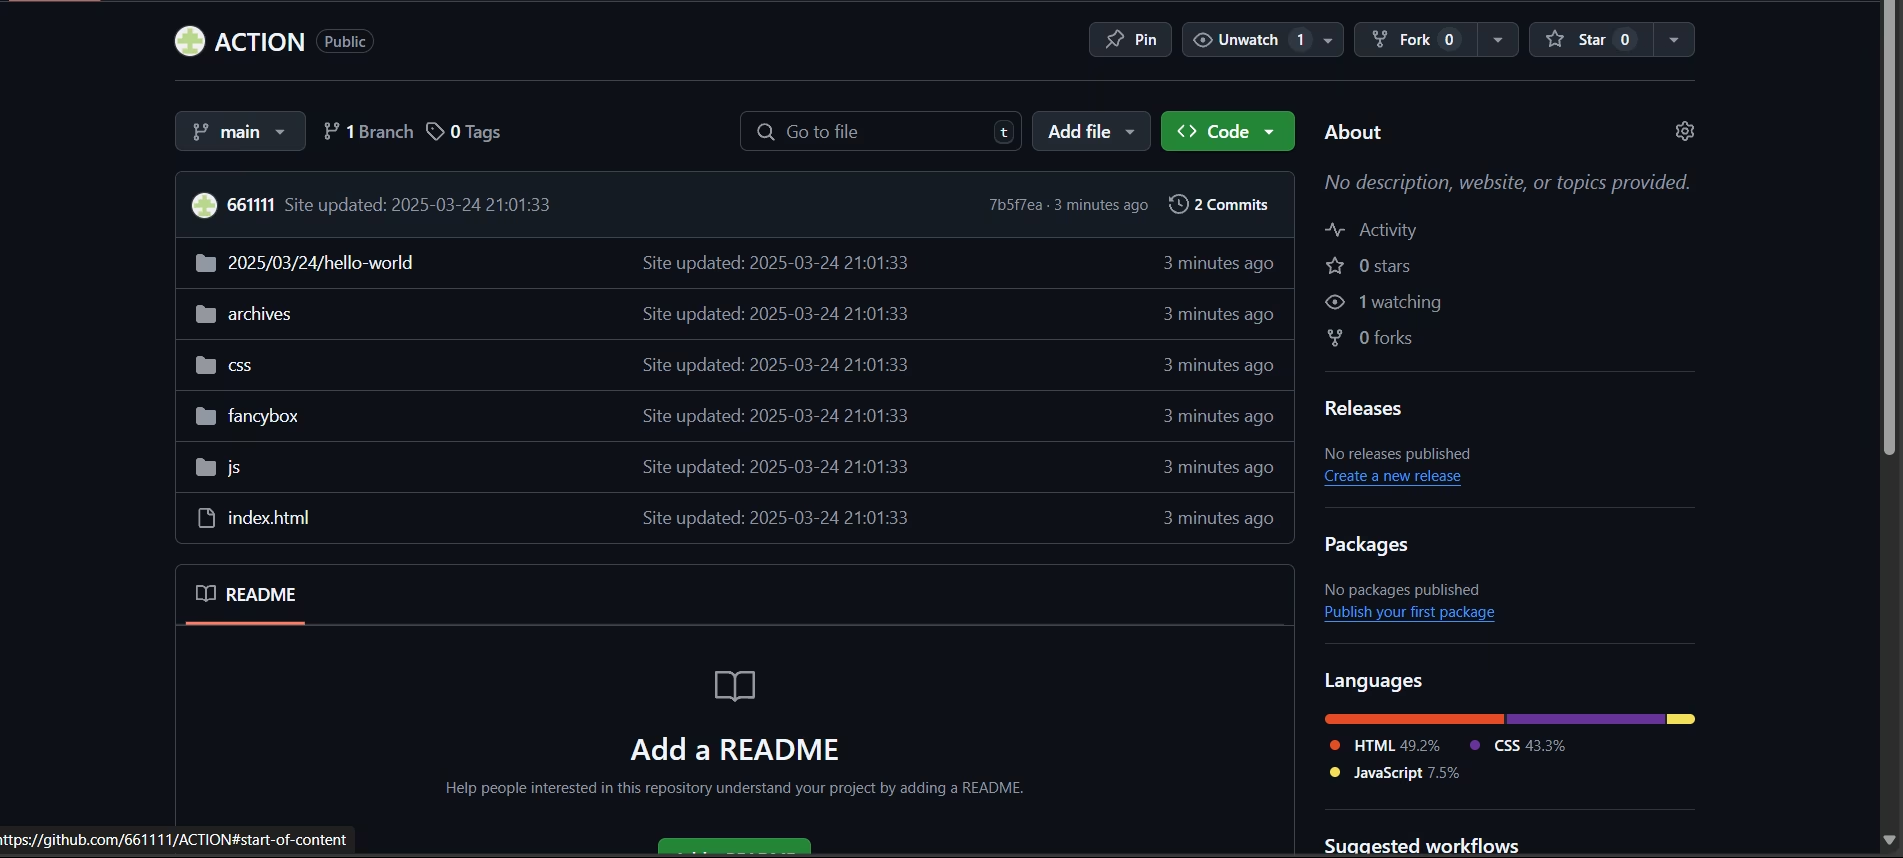
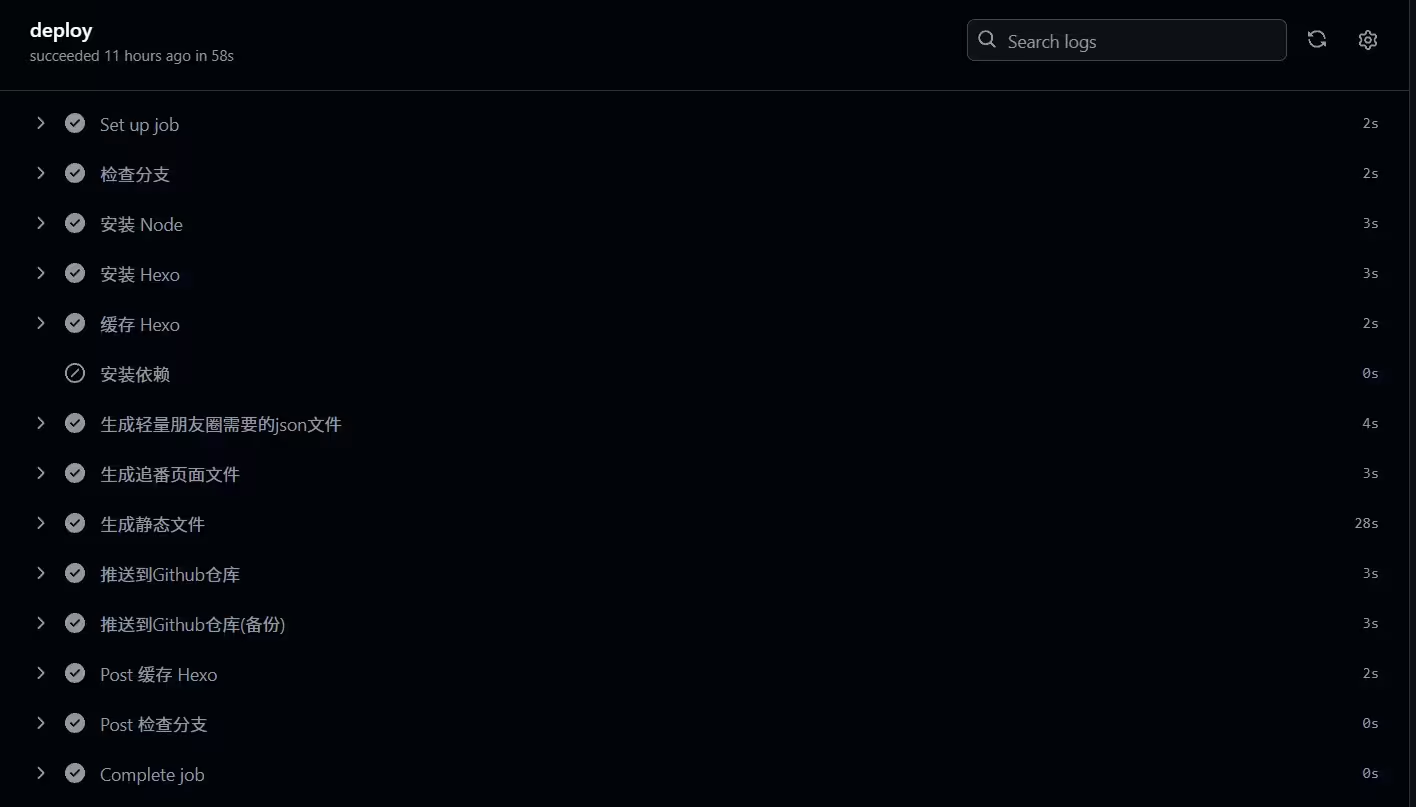
INFO  Validating config
INFO Deleted database.
INFO Validating config
INFO Start processing
INFO Files loaded in 103 ms
INFO Generated: archives/index.html
INFO Generated: archives/2025/index.html
INFO Generated: archives/2025/03/index.html
INFO Generated: index.html
INFO Generated: fancybox/jquery.fancybox.min.js
INFO Generated: css/style.css
INFO Generated: js/script.js
INFO Generated: fancybox/jquery.fancybox.min.css
INFO Generated: js/jquery-3.6.4.min.js
INFO Generated: css/images/banner.jpg
INFO Generated: 2025/03/24/hello-world/index.html
INFO 11 files generated in 313 ms
INFO Validating config
INFO Deploying: git
INFO Setting up Git deployment...
Initialized empty Git repository in D:/sxiaohe/sxiaohe/blog-demo/.deploy_git/.git/
[master (root-commit) 61e96f4] First commit
1 file changed, 0 insertions(+), 0 deletions(-)
create mode 100644 placeholder
INFO Clearing .deploy_git folder...
INFO Copying files from public folder...
INFO Copying files from extend dirs...
warning: in the working copy of '2025/03/24/hello-world/index.html', LF will be replaced by CRLF the next time Git touches it
warning: in the working copy of 'archives/2025/03/index.html', LF will be replaced by CRLF the next time Git touches it
warning: in the working copy of 'archives/2025/index.html', LF will be replaced by CRLF the next time Git touches it
warning: in the working copy of 'archives/index.html', LF will be replaced by CRLF the next time Git touches it
warning: in the working copy of 'css/style.css', LF will be replaced by CRLF the next time Git touches it
warning: in the working copy of 'fancybox/jquery.fancybox.min.js', LF will be replaced by CRLF the next time Git touches it
warning: in the working copy of 'index.html', LF will be replaced by CRLF the next time Git touches it
warning: in the working copy of 'js/jquery-3.6.4.min.js', LF will be replaced by CRLF the next time Git touches it
warning: in the working copy of 'js/script.js', LF will be replaced by CRLF the next time Git touches it
[master 7b5f7ea] Site updated: 2025-03-24 21:01:33
12 files changed, 2475 insertions(+)
create mode 100644 2025/03/24/hello-world/index.html
create mode 100644 archives/2025/03/index.html
create mode 100644 archives/2025/index.html
create mode 100644 archives/index.html
create mode 100644 css/images/banner.jpg
create mode 100644 css/style.css
create mode 100644 fancybox/jquery.fancybox.min.css
create mode 100644 fancybox/jquery.fancybox.min.js
create mode 100644 index.html
create mode 100644 js/jquery-3.6.4.min.js
create mode 100644 js/script.js
delete mode 100644 placeholder
Enumerating objects: 27, done.
Counting objects: 100% (27/27), done.
Delta compression using up to 16 threads
Compressing objects: 100% (19/19), done.
Writing objects: 100% (27/27), 278.04 KiB | 11.58 MiB/s, done.
Total 27 (delta 4), reused 0 (delta 0), pack-reused 0 (from 0)
remote: Resolving deltas: 100% (4/4), done.
To https://github.com/661111/ACTION.git
+ ac892ea...7b5f7ea HEAD -> main (forced update)
branch 'master' set up to track 'https://github.com/661111/ACTION.git/main'.
INFO Deploy done: git
  1. 打开存储库,可以看到页面出现许多文件:
    alt text

云端构建

说完本机搭建,那么说说云端构建吧。其实云端构建就是本地有一份已经修改完但还没有发布到存储库,而存储库存储着之前的文件,相当于一份备份,当我们修改完发表到云端。先上传到存储库,存储库里的文件更新后自动触发action,成功后存储库和服务器上的博客会自动更新,vercel会开始构建静态文件,就可以看到新内容了。

开始之前

为了确保交由Github Action来持续部署时,Github Action 具备足够的权限来进行 hexo deploy 操作,需要先获取 Token。

访问 Github->头像(右上角)->Settings->Developer Settings->Personal access tokens->generate new token,创建的 Token 名称随意,但必须勾选 repo 项 和 workflows 项。


新建action工作流

  1. 在[Blogroot]新建.github文件夹,注意开头是有个.的。然后在.github 内新建 workflows 文件夹,再在 workflows 文件夹内新建 autodeploy.yml,在[Blogroot]/.github/workflows/autodeploy.yml 里面输入:
1
2
3
4
5
6
7
8
9
10
11
12
13
14
15
16
17
18
19
20
21
22
23
24
25
26
27
28
29
30
31
32
33
34
35
36
37
38
39
40
41
42
43
44
45
46
47
48
49
50
51
52
53
54
55
56
57
58
59
60
name: 自动部署
on:
push:
branches:
- main
release:
types:
- published

jobs:
deploy:
runs-on: ubuntu-latest
steps:
- name: 检查分支
uses: actions/checkout@v2
with:
ref: main

- name: 安装 Node
uses: actions/setup-node@v1
with:
node-version: "22.13.0"

- name: 安装 Hexo
run: |
export TZ='Asia/Shanghai'
npm install hexo-cli -g
- name: 缓存 Hexo
id: cache-npm
uses: actions/cache@v3
env:
cache-name: cache-node-modules
with:
path: node_modules
key: ${{ runner.os }}-build-${{ env.cache-name }}-${{ hashFiles('**/package-lock.json') }}
restore-keys: |
${{ runner.os }}-build-${{ env.cache-name }}-
${{ runner.os }}-build-
${{ runner.os }}-
- name: 安装依赖
if: ${{ steps.cache-npm.outputs.cache-hit != 'true' }}
run: |
npm install --global gulp-cli
npm update hexo --save
npm install --save

- name: 生成静态文件
run: |
hexo clean
hexo generate
gulp

- name: 推送到Github仓库
uses: JamesIves/github-pages-deploy-action@v4
with:
token: ${{ secrets.HEXO_TOKEN }}
repository-name: 661111/hexo-site-page
branch: main
folder: public
commit-message: "${{ github.event.head_commit.message }} Updated By Github Actions"
  1. 之后需要自己到仓库的 Settings->Secrets->actions 下添加环境变量,变量名参考表格:

如何添加:

参数参数内容是否需要
HEXO_TOKENgithub账号密钥

部署云端

  1. 添加屏蔽项
    因为能够使用指令进行安装的内容不包括在需要提交的源码内,所有我们需要将这些内容添加到屏蔽项,表示不上传到 github 上。这样可以显著减少需要提交的文件量和加快提交速度。
    打开[Blogroot]/.gitignore,输入以下内容:
1
2
3
4
5
6
7
8
9
10
.DS_Store
Thumbs.db
db.json
*.log
node_modules/
public/
.deploy*/
.deploy_git*/
.idea
themes/[改成你自己的主题名称]/.git
  1. 提交源码到私有仓库[SourceRepo]
    在博客根目录[Blogroot]下启动终端,使用 git 指令重设仓库地址。这样在新建仓库,我们仍旧可以保留珍贵的 commit history,便于版本回滚。
1
2
3
4
5
6
git remote rm origin # 删除原有仓库链接
git remote add origin https://github.com/[GithubUsername]/[SourceRepo].git #[SourceRepo]为新的存放源码的github私有仓库
git checkout -b main # 切换到main分支,
git add .
git commit -m "github action update"
git push origin main
  1. 查看部署情况
    打开 GIthub 存放源码的私有仓库,找到 action。
    1
    根据刚刚的 Commit 记录找到相应的任务
    2
    点击 Deploy 查看部署情况,如果看到全部打勾,即为成功
    3

  2. 如果在有加速的情况下有时候无法正常上传,可以再追加命令行:

1
2
3
4
git add .
git commit -m "github action update"
git rebase --continue
git push -f origin main